
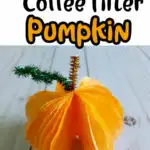
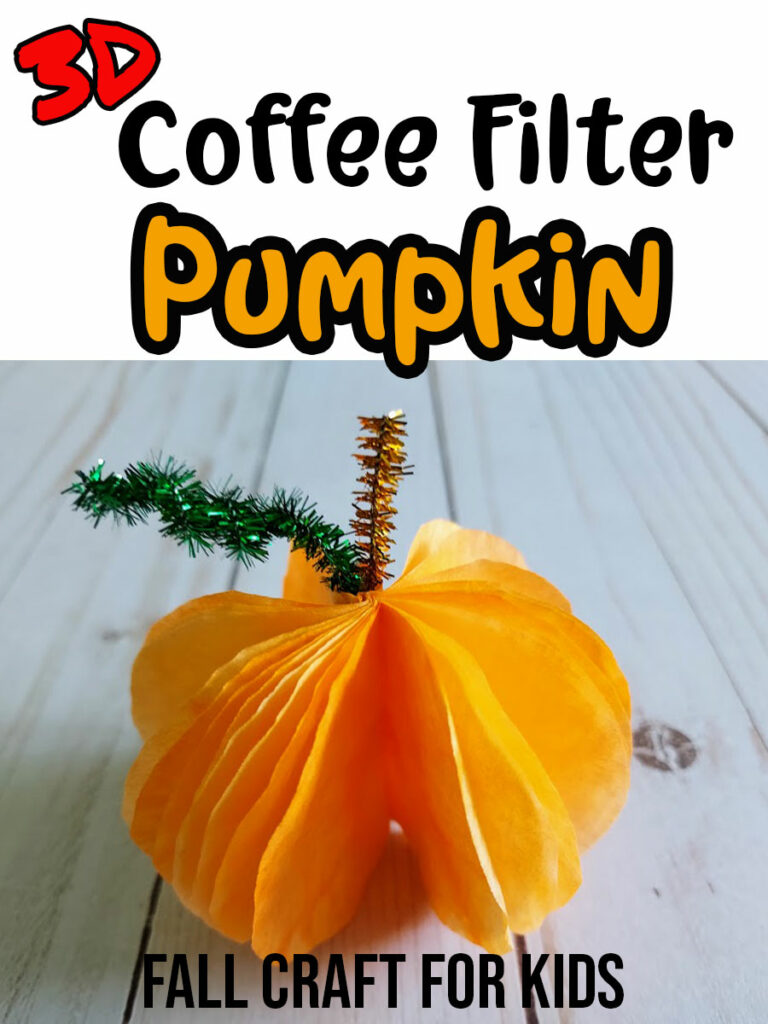
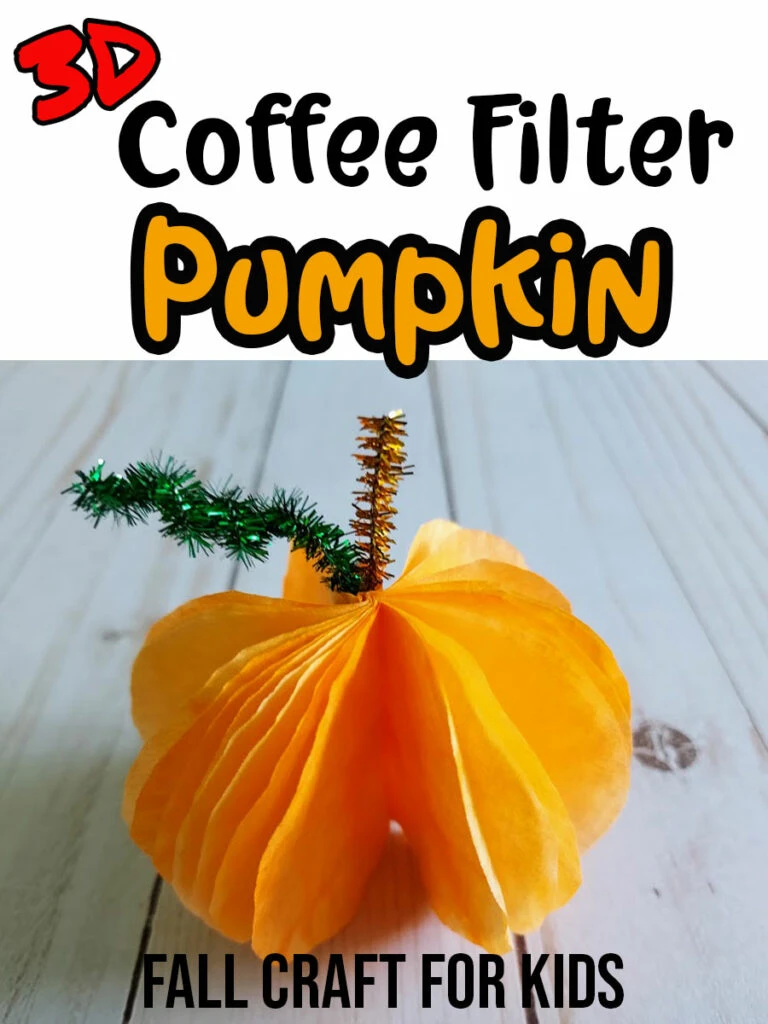
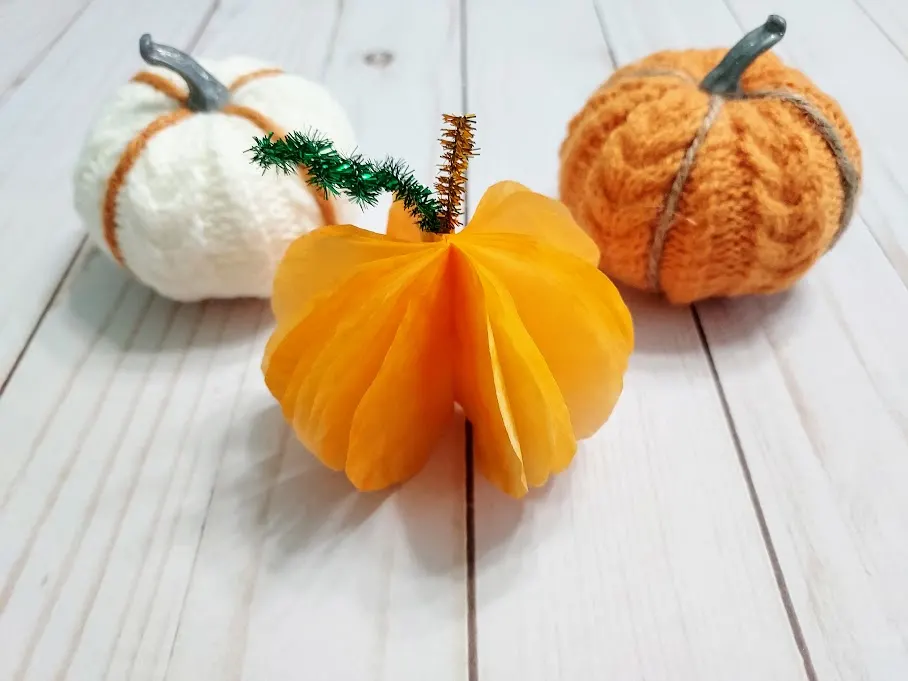
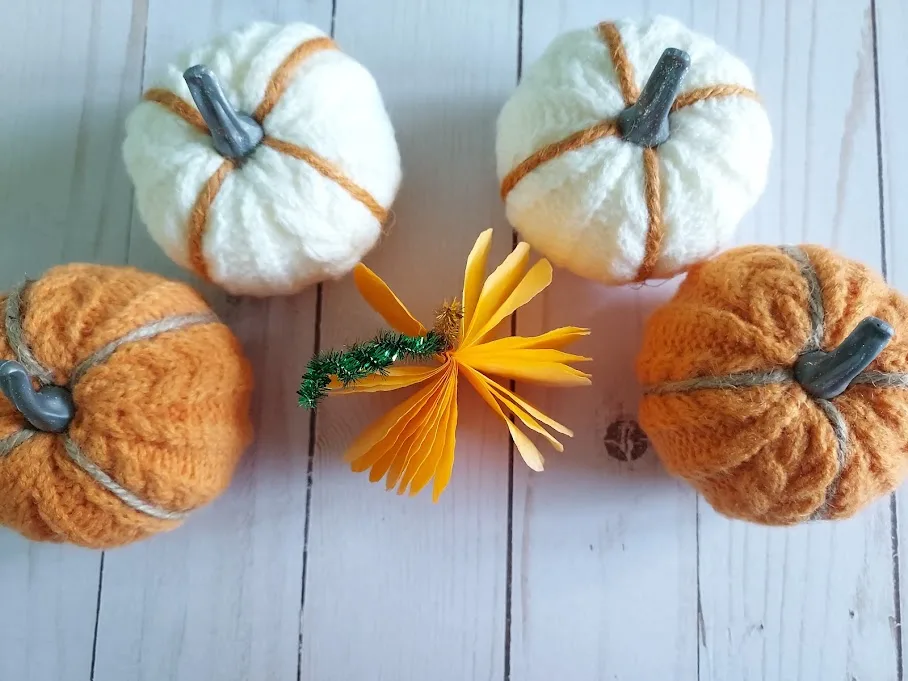
Get inspired with our coffee filter crafts for kids all year long! One standout project is the free-standing 3D coffee filter pumpkin craft, which offers plenty of decorating possibilities.
This fun and creative activity is ideal for fall. You can use these adorable three-dimensional pumpkins to enhance your seasonal decor. They’re perfect for Halloween festivities and can transition into Thanksgiving decorations.
With just a few materials, kids can express their creativity while creating beautiful fall-themed decorations for your home.
This craft project is ideal for kindergarten and elementary age children. Preschool age children can also complete this craft with some assistance.
It’s an easy and inexpensive activity to do at home or school.
3D Pumpkin Coffee Filter Halloween Craft
This coffee filter pumpkin craft uses just a few common craft supplies and only takes about 20 minutes to complete (plus additional drying time).
Like most of our other Halloween crafts for kids, you can do this craft at home, as a family, or at a school. It’s a quick and easy craft to include in an art center this fall. This project also makes a wonderful Thanksgiving craft for kids.
Making these coffee filter pumpkins is a fun fine motor activity for preschool and kindergarten children that provides coloring, tracing, cutting and gluing practice.
Older children will also enjoy this craft that they can complete mostly independently.
Please note: Younger children may need assistance with the stapling step.
I love how this method of coloring the coffee filters makes it look like watercolor painting!
Kids will love spraying the coffee filters with water and watching the colors blend too. Another neat project to try is pumpkin salt painting. Both of these crafts are part science experiment, part art!
Coffee Filter Halloween Crafts
Kids absolutely love making coffee filter Halloween crafts!
These hands-on projects ignite their creativity and bring excitement as they transform simple materials into cute and spooky decorations.
They are perfect for fall art centers in classrooms or at home, allowing children to experiment with colors and crafting techniques.
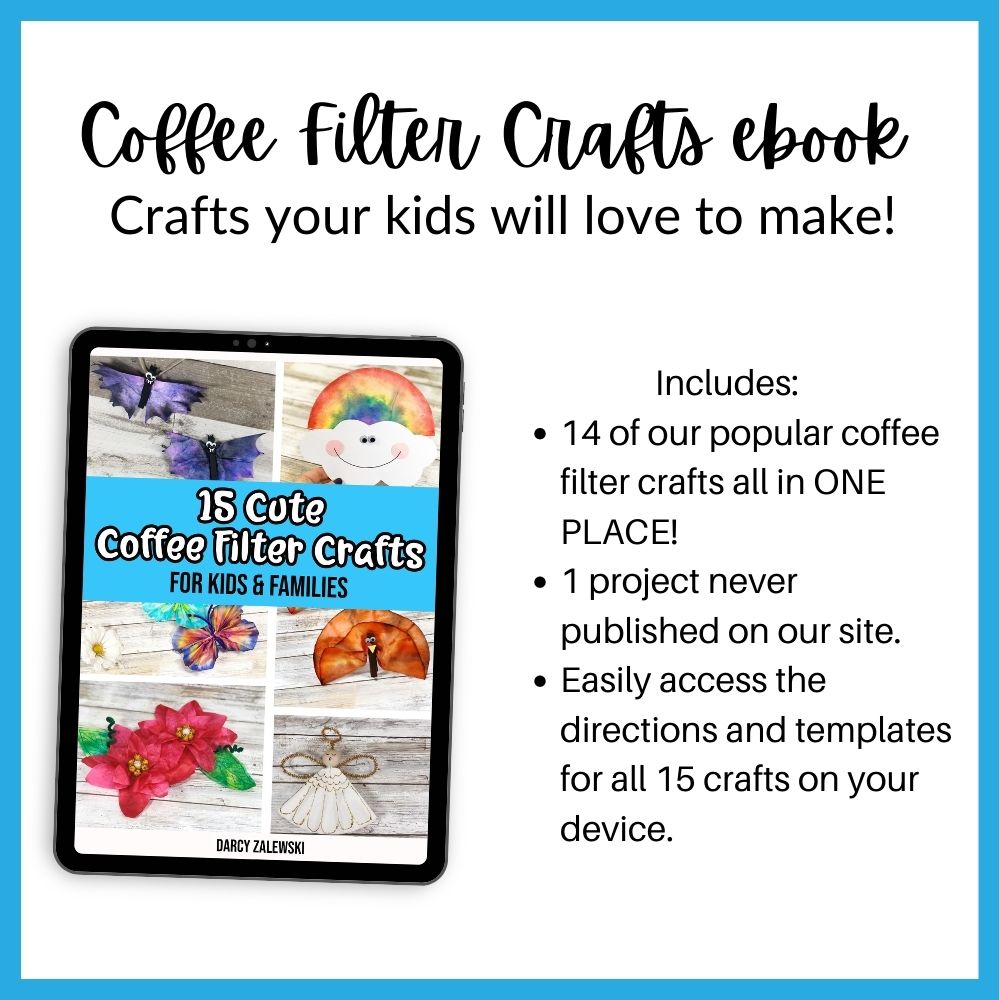
Cute Coffee Filter Crafts eBook
What Skills Does This Activity Work On?
This fun pumpkin craft almost has more fine motor skills practice opportunities than seeds! Folding, cutting, tracing, coloring, and stapling all give little hands big practice.
Prediction skills, an important part of reading, come into play here too.
What will happen to the coffee filters when they blend their chosen colors? How did their choices at the beginning make the result at the end? Why?

This is a great opportunity to play with other blending activities, such as watercolors, to introduce and reinforce art skills. Remind them the goal is not to make brown!
Ask kids to compare and contrast their pumpkin creation with a real pumpkin.
Challenge them to come up with as many similarities and differences as possible! (This is also a sweet opportunity to send each kiddo home with a real mini-pumpkin of their own).
Pumpkin Unit Study Ideas
Plant some (pumpkin) seeds of learning! Kids of all ages can explore a variety of math skills with real pumpkins in one of these fun study units.
Learn all about healthy eating with this fall fruit. Yes, it’s a fruit! Some of their favorite veggies may be fruit, too! Cucumbers, tomatoes, and even olives are often misidentified as vegetables.
Bring in one each of the top 10 (any number) of misidentified fruits and ask kids which is which. They’ll be perplexed!
Go over the science of identification between the two, then try them out! Does knowing a most hated vegetable isn’t actually a vegetable change how they feel about it?
This is also a great opportunity to discuss why it’s important to “eat the rainbow.” You can also throw in some harvest-related and farm-to-table (or market) learning through literature.
A fun field trip to a farmer’s market, supermarket, orchard, or farm will make this fruit-filled unit of study extra delicious!
This post contains affiliate links. As an Amazon Associate and a participant in other affiliate programs, we earn a commission on qualifying purchases.
Tru-Ray Construction Paper, 10 Vibrant ColorsDarice 1000 Pcs Popsicle StickMulti-Color Pom Poms, 1200pcs Assorted Size & ColorCrayola Mini Twistables Crayons (50ct), Crayons for Toddlers, 3+Elmer’s All Purpose Glue Sticks, WashableFiskars Training Scissors for Kids 3+ with Easy Grip (3-Pack) – Toddler Safety Scissors


Children’s Books About Pumpkins
Integrating the 3D coffee filter pumpkin craft with engaging children’s books about pumpkins can enrich the crafting experience.
Reading stories like “Pumpkin Jack” or “It’s Pumpkin Day, Mouse!” can spark their imagination as kids cut, fold, and decorate their adorable pumpkins.
These books enrich literacy and storytelling skills while fostering an immersive environment where children can connect the craft to the narratives they discover.
Discussing the characters and plots while crafting adds another layer of creativity, encouraging children to express their thoughts and ideas as they bring their pumpkins to life.
You’re My Little Pumpkin PieIt’s Pumpkin Day, Mouse! (If You Give…)Pumpkin JackFrom Seed to Pumpkin: A Fall Book for Kids (Let’s-Read-and-Find-Out Science 1)Too Many PumpkinsBiscuit Visits the Pumpkin Patch: A Fall and Halloween Book for Kids


3D Coffee Filter Pumpkin Craft Supplies:
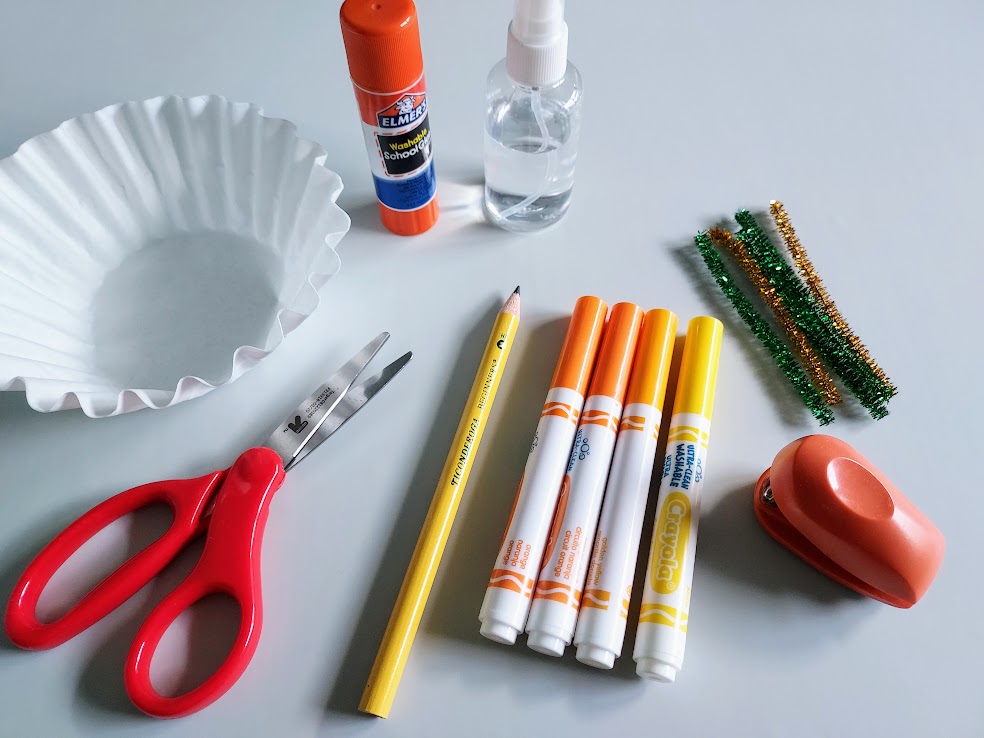
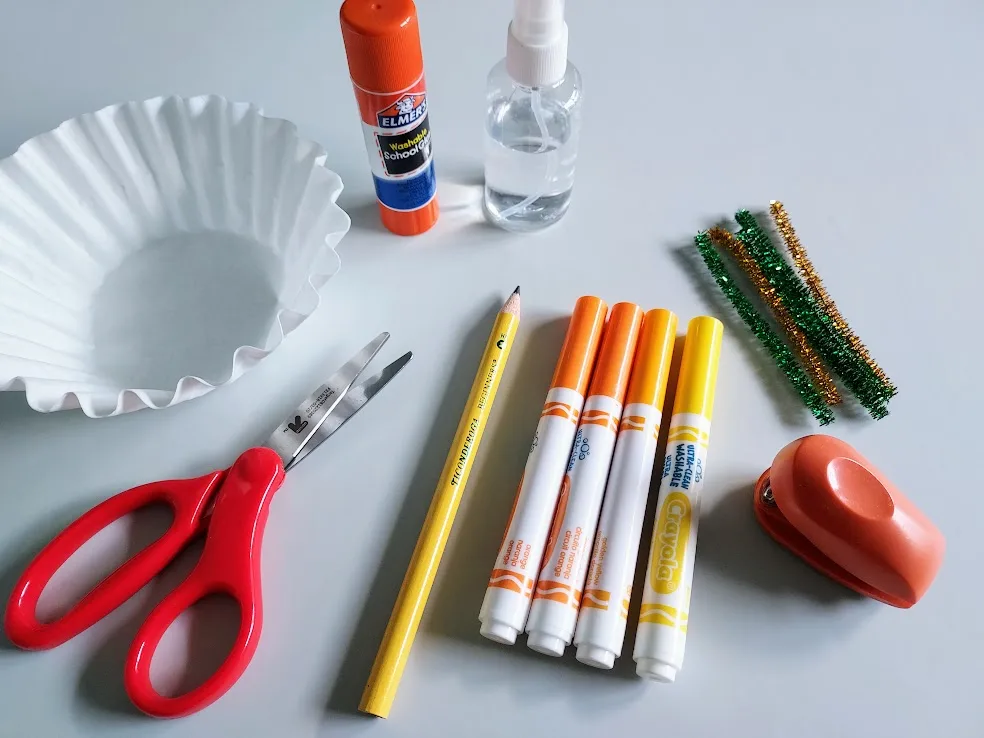
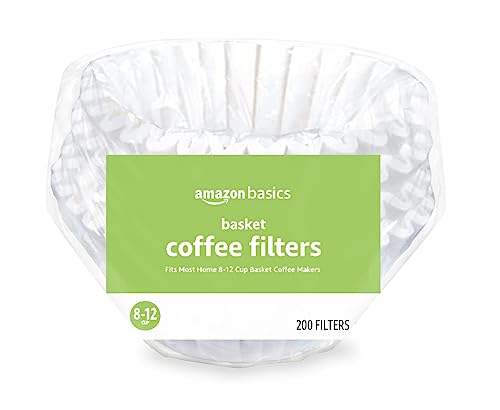
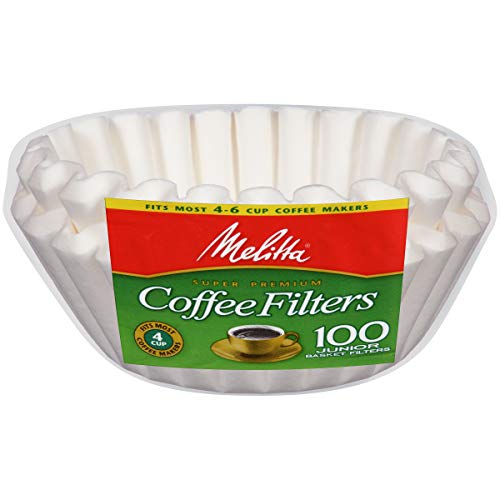
- 2-3 Round White Coffee Filters
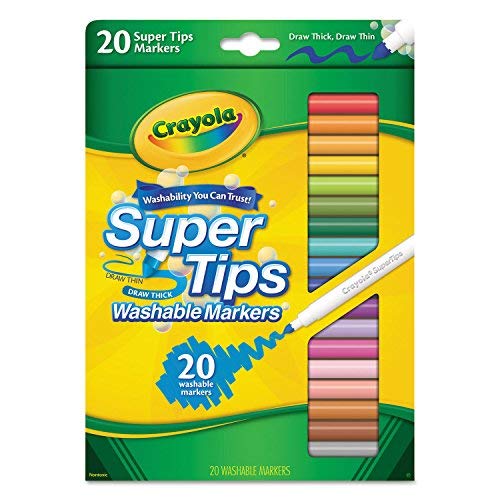
- Washable Markers
- Green and Orange Chenille Stems
- Glue Dots or Glue Stick
- Scissors
- Stapler
- Pencil (for tracing and shaping)
- Water Spray Bottle (for color blending)
- Paper Plate, Parchment Paper, Ziploc bag or craft mat
How to Make 3D Coffee Filter Pumpkins:
Start by flattening out round coffee filters. I used three for one pumpkin.
Draw on them with orange (or a combination of yellow and orange) washable markers. Lightly color the entire area.

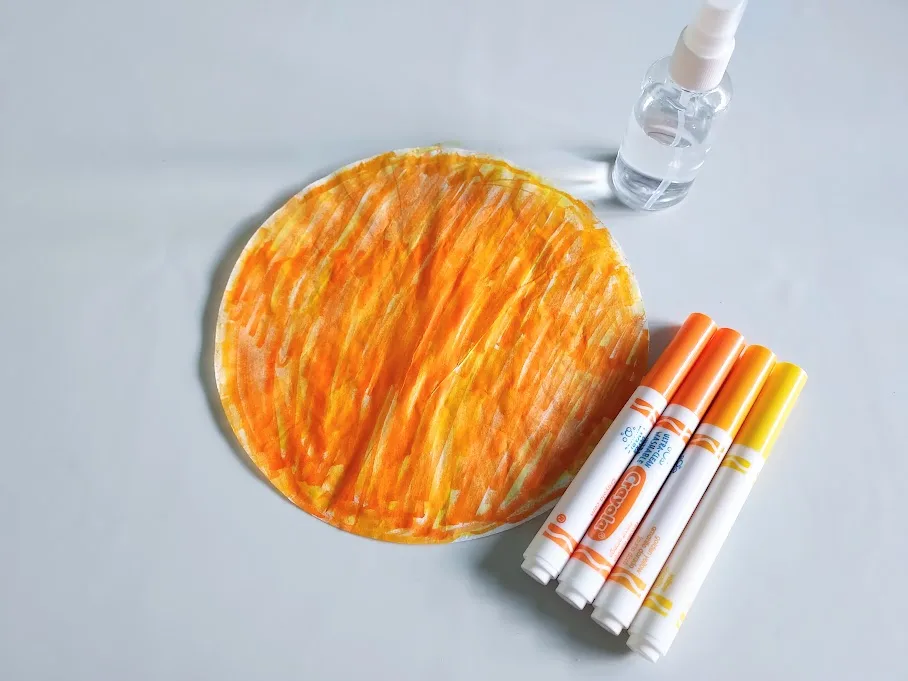
Tip: Coffee filters bleed color because they are so thin. Placing your coffee filter on top of a piece of construction or printer paper while coloring will help protect your work surface.
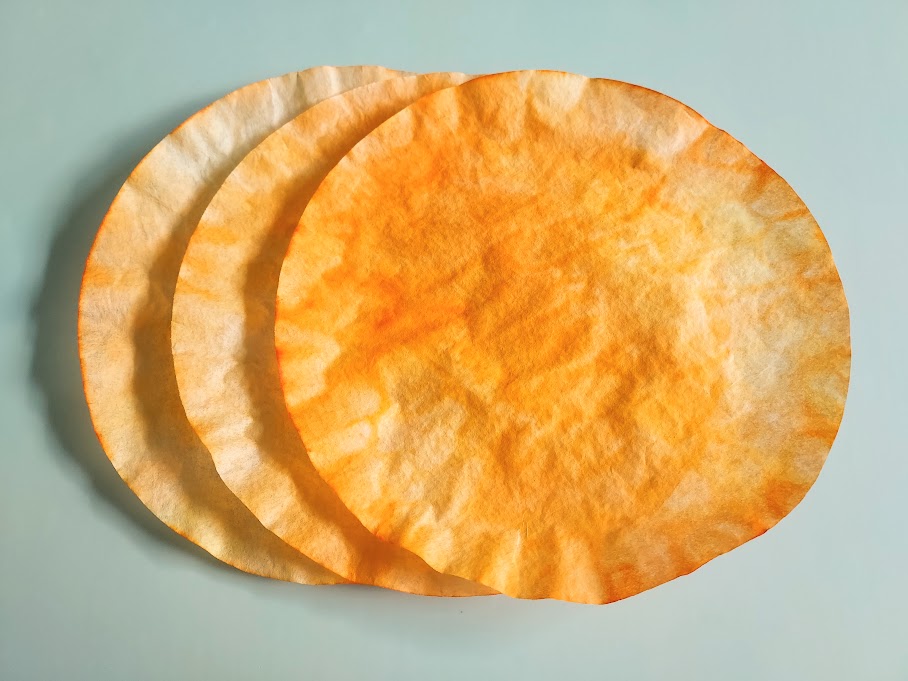
Place the colored coffee filters on a paper plate, sheet of parchment paper, craft mat or large zippered baggie and spray with water. Have fun watching the magic of the colors move and blend! Set aside to dry.
These may require additional drying time depending on how much water is sprayed on the coffee filter during the blending stage.
Once your coffee filters are dry, it is time to make your pumpkin shapes!
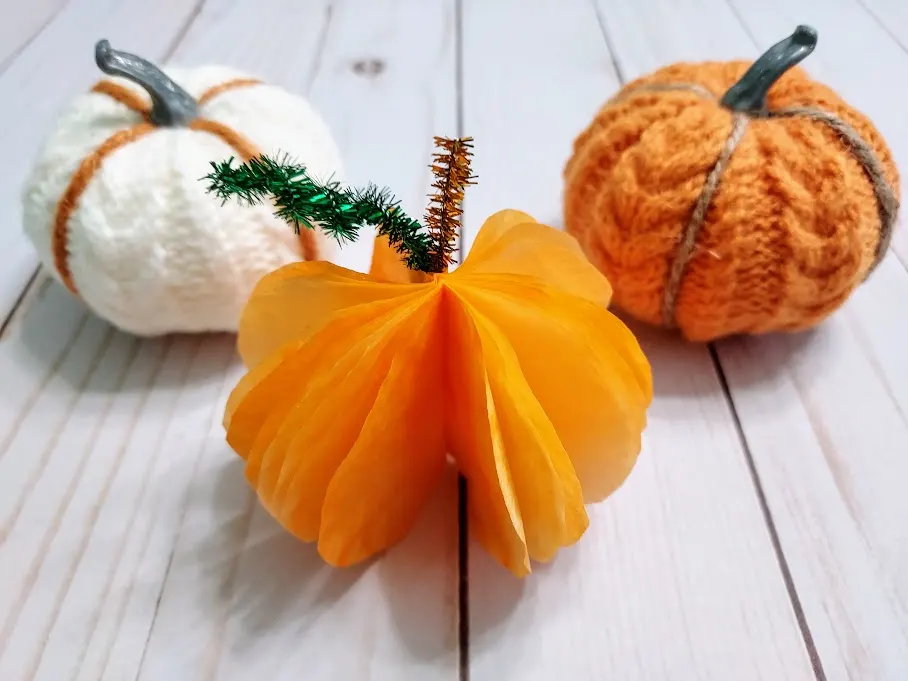
First, begin by stacking your coffee filters and then folding your coffee filter in half, then in half again and again until you have a total of 3 folds (see picture).
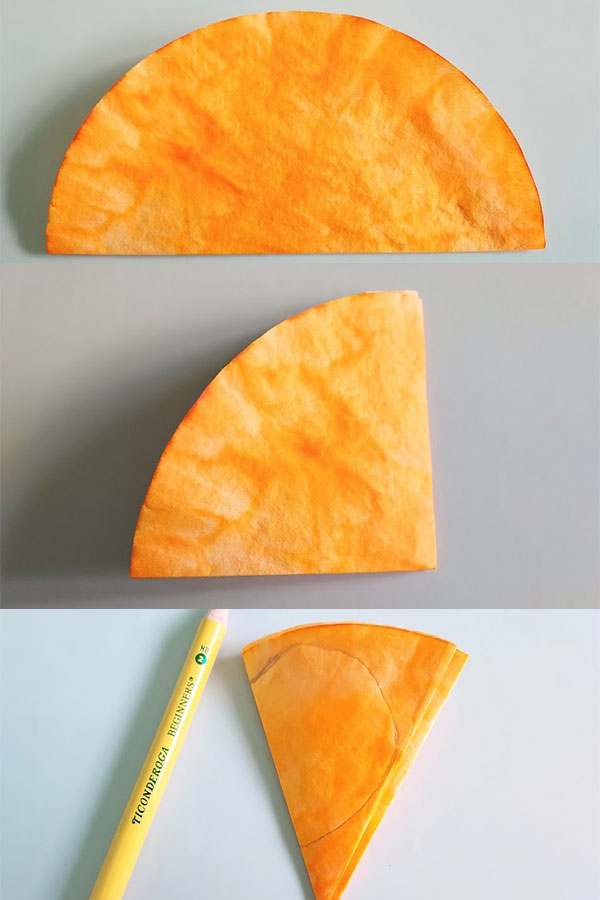

Next, trace a rounded half-pumpkin shape keeping the bottom as flat as possible so it is easy to stand.

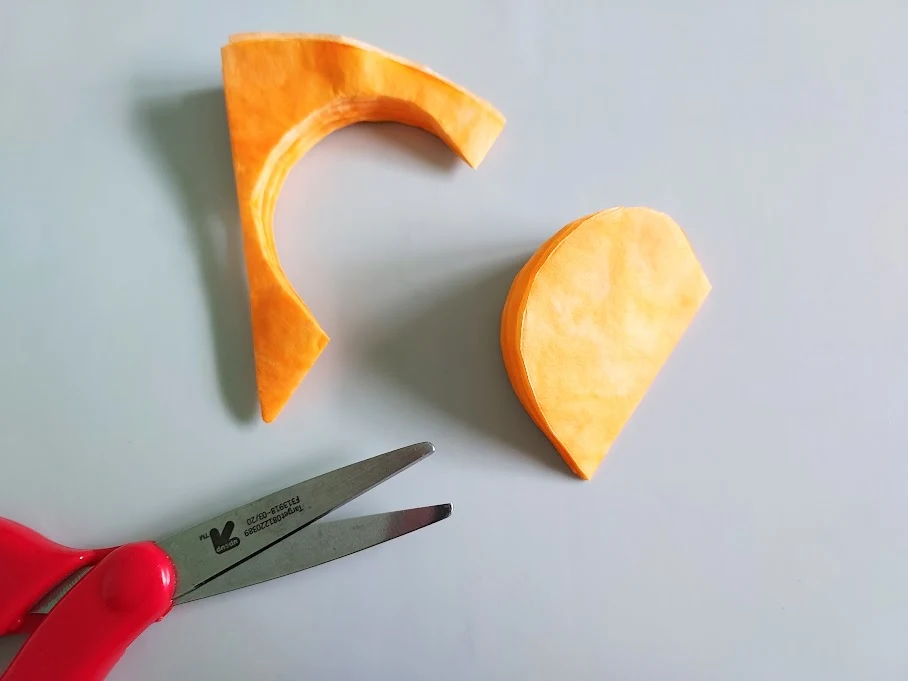
Carefully cut along your trace line.

Once all of your cuts are made, while keeping the pumpkins folded, stack them together and add one staple along the fold line horizontally aligning with the folded edge.
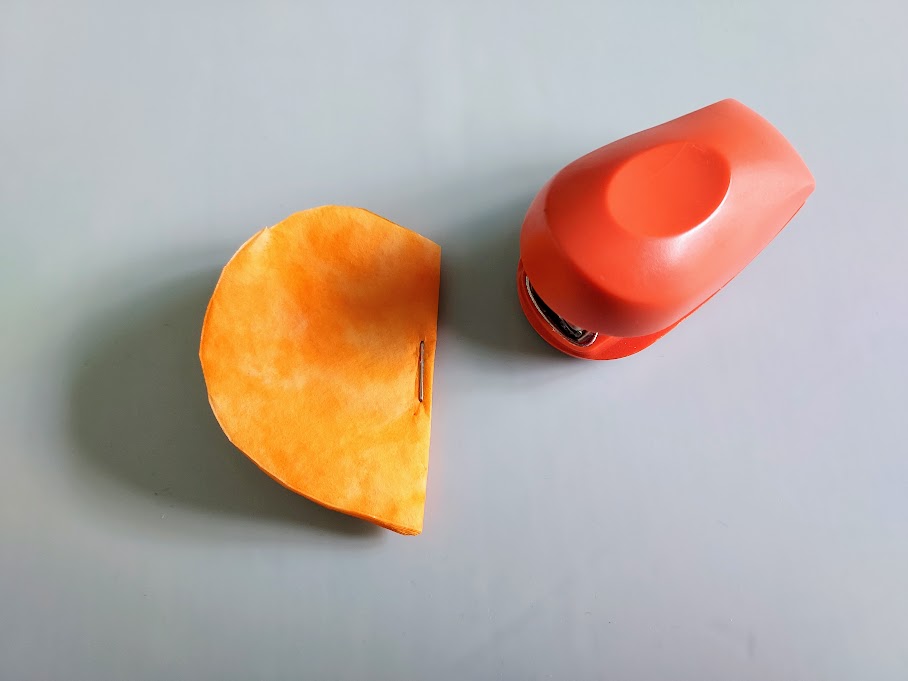
Next, using your glue dots or glue stick, attach both the orange and green chenille stems also along the fold line.

I cut the chenille stems into 4” pieces and then trimmed them later.
Once the chenille stems are glued in, enclose them between two of the flaps, gluing the pieces together to hide where you attached the stems.

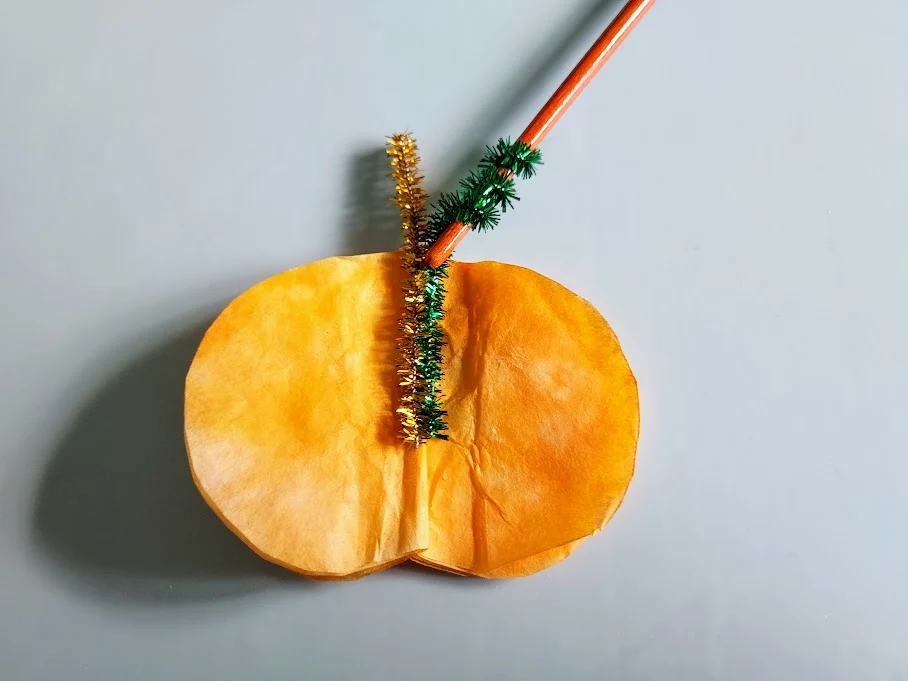
Finally, carefully fan out your pumpkin, shaping it, until it can stand on its own.
Lastly, using a pencil or paintbrush, carefully twist the green chenille stem around one end to make a twist.
Tips for Coloring Coffee Filters
Coloring coffee filters is a delightful and often overlooked crafting activity.
Feel free to generously cover the filters with marker ink—the more you use, the bolder the colors will appear when blended with water.
You can place the coffee filters on a craft mat, parchment paper, a zippered plastic bag, or even a paper plate before spraying to protect your work surface.
The filter paper is thin, and the ink may bleed through, potentially causing stains.
Just so you know, additional drying time may be necessary, depending on how much water you apply during the blending process.
You must use washable markers, as permanent markers like Sharpies will not spread or blend effectively.
This technique isn’t your only option, though! Feel free to experiment with watercolor paints.
If you prefer to skip the drying time, try using crayons and avoid the water blending stage altogether.
Crayola 588106 Washable Super Tips Markers, Assorted, 20/SetMelitta 600 Coffee Filters, Basket, Pack of 600, 8-12 Cups, WhiteCrayola Ultraclean Broadline Classic Washable Markers (10 Count), (Pack of 2)Mr. Pen- Washable WatercolorsAmazon Basics Basket Coffee Filters for 8-12 Cup Coffee Makers, White, 200 CountTru-Ray Construction Paper, 10 Vibrant Colors, 9


Fun Ways to Use Your Coffee Filter Pumpkins
Once you’ve crafted your coffee filter pumpkins, there are plenty of fun ways to put them to use!
Create a charming display by arranging a row of pumpkins on your mantle or grouping several for an adorable centerpiece on your table.

For a creative twist, consider gluing them onto construction paper to make a pop-up art project or to include in a festive holiday card.
If you want to give them a playful touch, transform your pumpkins into mini jack-o-lanterns by cutting out facial features from black construction paper and attaching them or simply drawing a face with a black marker.
More Fall Craft Ideas for Kids
As fall arrives, it brings plenty of fun craft ideas for kids, encouraging them to get creative with autumn-themed projects. There’s so much to choose from, such as apples, bats, and turkeys.
These activities keep kids entertained and help them develop fine motor skills and express their artistic side.
Check out these fabulous fall craft ideas to inspire young artists as they make decorations and gifts!
- Coffee Filter Turkeys
- Fall Tissue Paper Suncatchers Craft
- Turkey Name Craft
- Apple Core Popsicle Stick Craft
- Bat Tissue Paper Suncatcher Craft
Creating a 3D coffee filter pumpkin craft offers numerous benefits for children. For example, enhancing fine motor skills, igniting creativity, and promoting critical thinking through color blending and design choices.
As kids engage in this hands-on activity, they have fun and develop essential skills that support their overall growth.
Sign up for our newsletter and receive daily activity and craft ideas tailored for kids to keep the inspiration flowing!

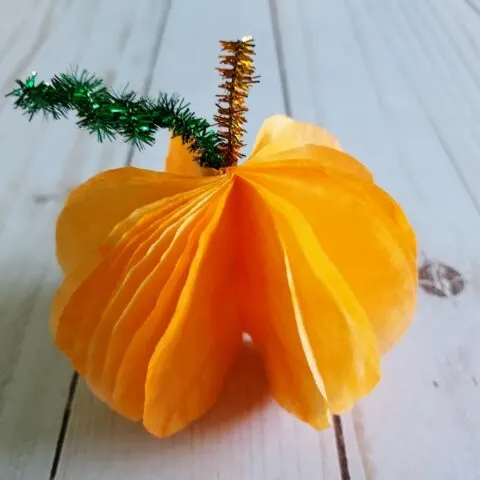
3D Coffee Filter Pumpkin Craft
Make this cute three dimensional coffee filter pumpkin for a fun fall craft.
Materials
- 2-3 Round White Coffee Filters
- Washable Markers
- Chenille Stems - Green, Orange
- Glue Dots or Glue Stick
Tools
- Scissors
- Stapler
- Pencil (for tracing and shaping)
- Water Spray Bottle (for color blending)
- Paper Plate, parchment paper, ziploc bag or craft mat
Instructions
- Start by flattening out round coffee filters. I used three for one pumpkin.
- Draw on them with orange (or a combination of yellow and orange) washable markers. Lightly color the entire area.
- Place the colored coffee filters on a paper plate, sheet of parchment paper, craft mat or large zippered baggie and spray with water. Have fun watching the magic of the colors move and blend! Set aside to dry.
- Once your coffee filters are dry, it is time to make your pumpkin shapes!
- First, begin by stacking your coffee filters and then folding your coffee filter in half, then in half again and again until you have a total of 3 folds.
- Next, trace a rounded half-pumpkin shape keeping the bottom as flat as possible so it is easy to stand.
- Carefully cut along your trace line.
- Once all of your cuts are made, while keeping the pumpkins folded, stack them together and add one staple along the fold line horizontally aligning with the folded edge.
- Next, using your glue dots or glue stick, attach both the orange and green chenille stems also along the fold line.
- I cut the chenille stems into 4” pieces and then trimmed them later.
- Once the chenille stems are glued in, enclose them between two of the flaps, gluing the pieces together to hide where you attached the stems.
- Finally, carefully fan out your pumpkin, shaping it, until it can stand on its own.
- Lastly, using a pencil or paintbrush, carefully twist the green chenille stem around one end to make a twist.
Notes
Coffee filters bleed color because they are so thin. Placing your coffee filter on top of a piece of construction or printer paper while coloring will help protect your work surface.
These may require additional drying time depending on how much water is sprayed on the coffee filter during the blending stage.
Recommended Products
As an Amazon Associate and member of other affiliate programs, I earn from qualifying purchases.


Darcy is the founder of “Life With Darcy and Brian,” where she combines her love for education, board games, and crafting to create engaging learning experiences for kids. Her creative projects and writing have been featured in outlets like The Toy Insider, CafeMom, Mom.com, Parents.com, Country Living, and The Pioneer Woman.
Carol
Thursday 18th of September 2025
Fantastic projects for kids or adults! I can see a bunch scattered on a Fall table. Featuring when my link party opens!
Julie
Sunday 14th of September 2025
What a lovely idea, and so easy to make too. Thank you for sharing with us at Handmade Monday :-)
Paula
Monday 30th of September 2024
Darcy, I was just looking around for pumpkin crafts for myself. Lol. I can't wait to make these. Thanks' so much for sharing with Sweet Tea & Friend's September link up.