
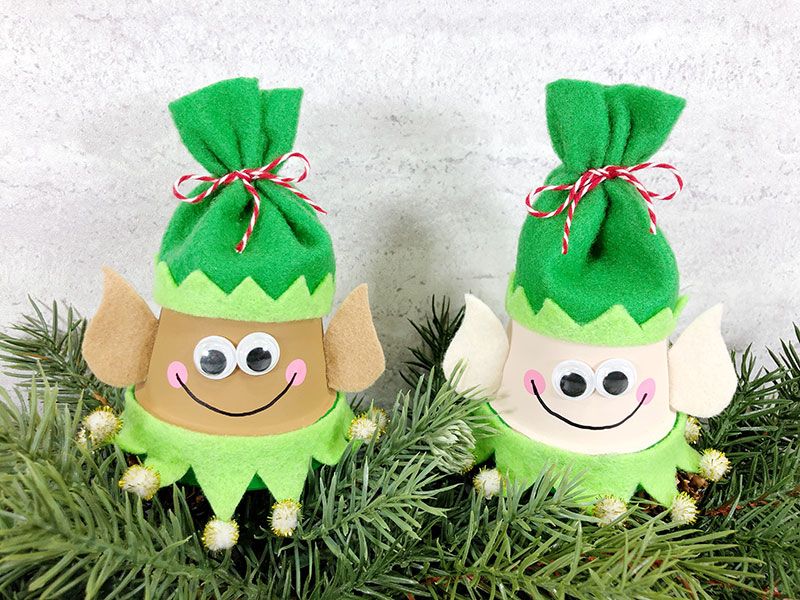
This Elf Clay Pot Ornament craft is one of our super cute Christmas crafts for kids. They’ll have fun creating it whether or not you have a visiting elf on your shelf.
They will love transforming plain mini clay flower pots from the craft store into adorable elf ornaments to hang on the Christmas tree. If you don’t want to hang them, they would look adorable on a shelf too.
It’s a great project for preschool, kindergarten, and elementary school children to make at home or school. They’ll love making a new ornament for the tree!
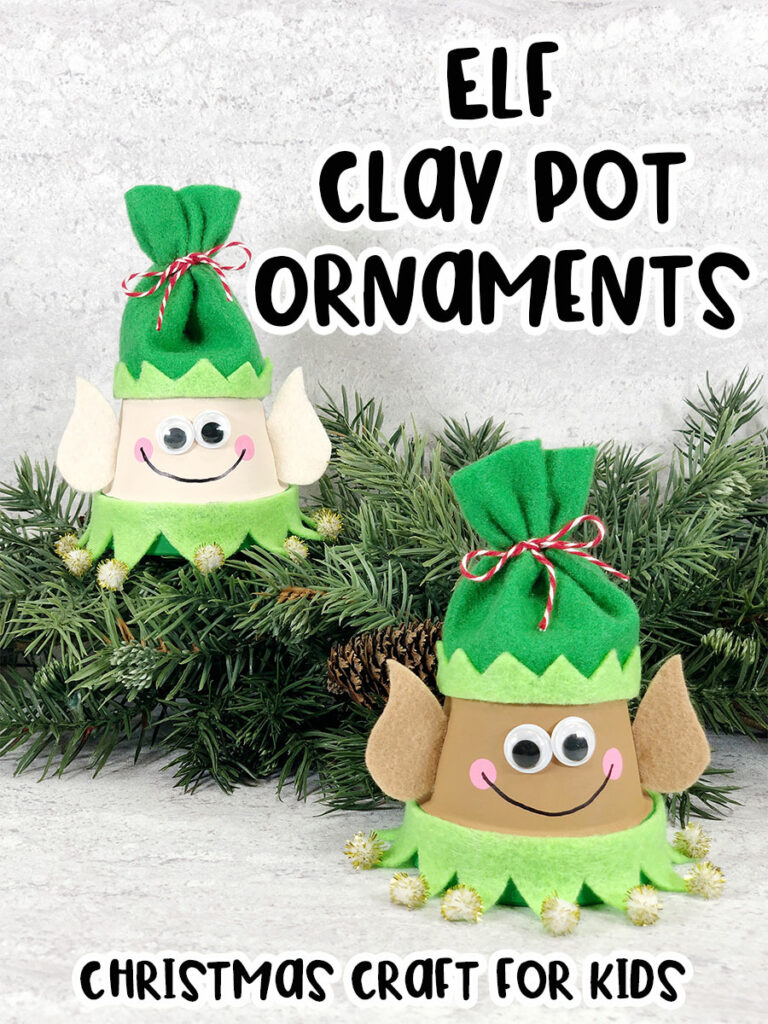

Elf Mini Terra Cotta Flower Pot Ornament
Children will have fun painting the clay pots and transforming them into little elves.
This project makes an excellent family activity and it works great as a classroom art project too!
Younger kids may need assistance with cutting out the felt pieces and assembling their elves.
If doing this as a group activity, I recommend prepping the felt pieces ahead of time.
Older kids can complete this project with minimal assistance.
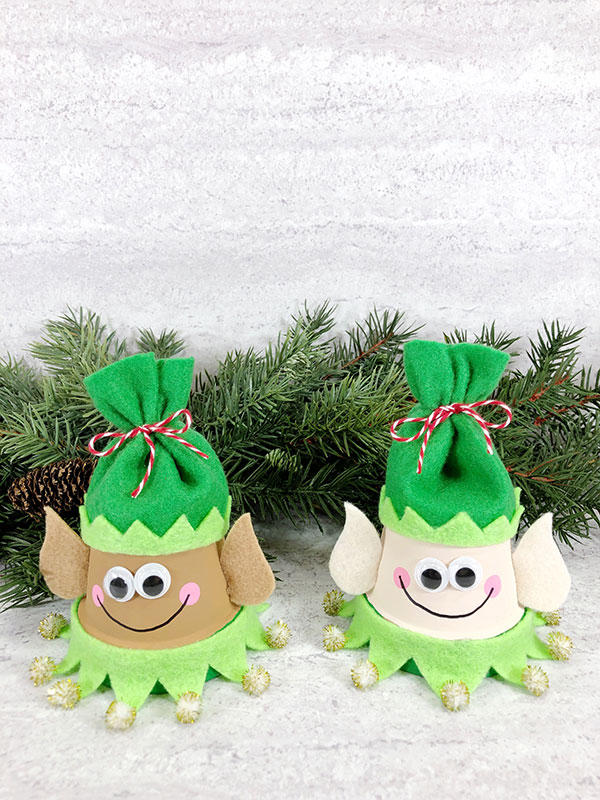
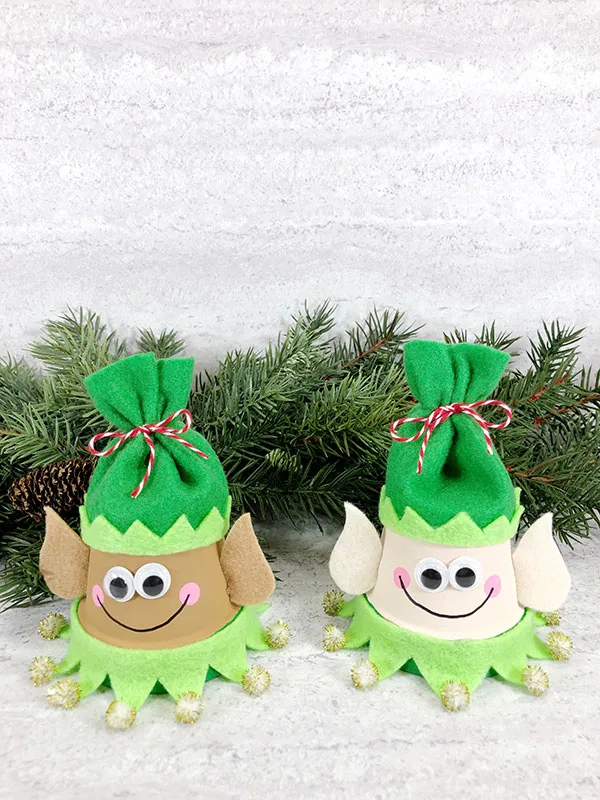
These flower pot elves make a great homemade Christmas gift. They are Christmas ornaments that you can hang year after year.
This post contains affiliate links. As an Amazon Associate and a participant in other affiliate programs, we earn a commission on qualifying purchases.
For assembly, I recommend using a low temp hot glue gun, but you can also use my favorite tacky craft glue. The craft glue will take longer to dry between steps and may not hold as well as hot glue long term.
It’s the perfect craft activity to go along with reading Christmas picture books for kids!
More Christmas Crafts for Kids
- Reindeer Clay Pot Ornament
- Christmas Tree Clay Pot Ornament
- Coffee Filter Wreath
- No Sew Felt Christmas Tree
- No Sew Felt Snowman

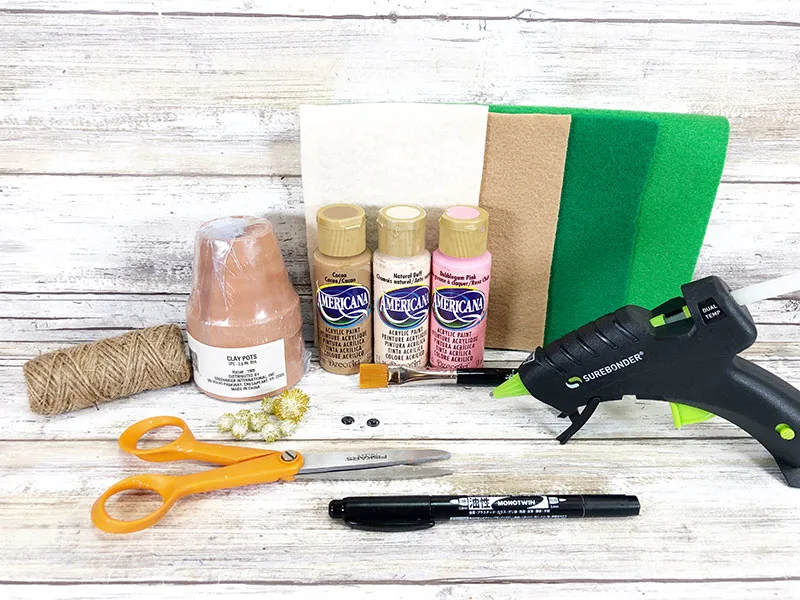
Clay Pot Elf Craft Supplies:
- Printable CLAY POT ELF CRAFT TEMPLATE
- Mini Clay Pots (2.5” in diameter)
- Acrylic Craft Paint in Flesh Tone Colors, Kelly Green, and Pink
- Craft Felt in Bright Green, Kelly Green, and Flesh Tone Colors to Match Paint
- Natural Jute Twine
- 2 Googly Eyes per clay pot
- Gold Tinsel Pom Poms
- Red and White Baker’s Twine
- Black Permanent Marker
- Low Temp Glue Gun or Tacky Craft Glue
- Scissors
- Paintbrush
- Pencil with New Eraser
You can use tacky craft glue for this project, but you will have to wait for it to dry. Using a hot glue gun will also make the finished ornament more durable.
How to Make a Mini Clay Pot Elf:
First you will need to download and print out our printable Clay Pot Elf craft template (available for free using the form at the end of this post) or plan to draw and cut out your own pieces freehand.
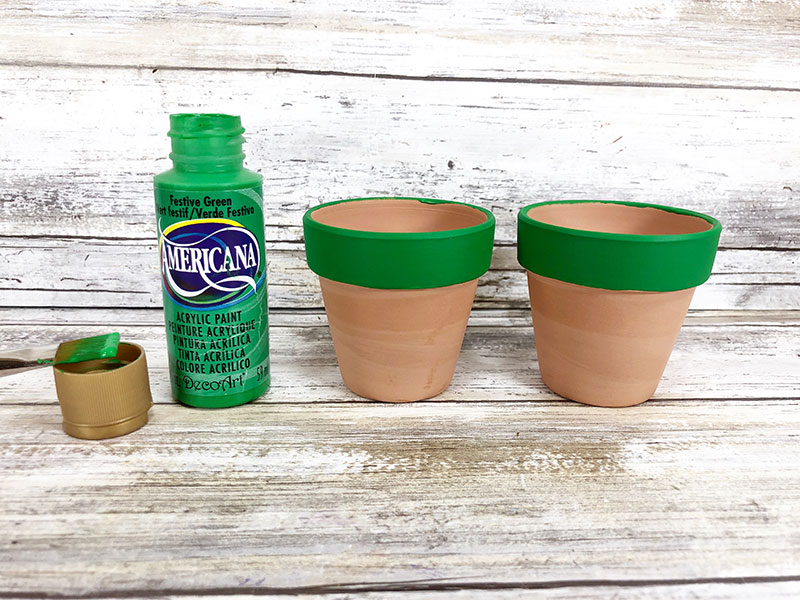
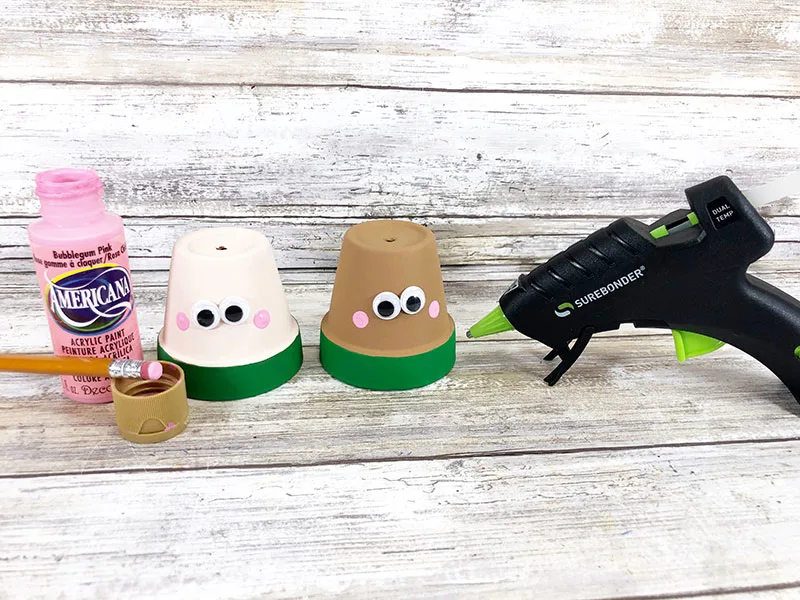
Paint the rim of the 2.5” clay pot with kelly green acrylic craft paint. Let the paint dry and apply a second coat, if necessary.

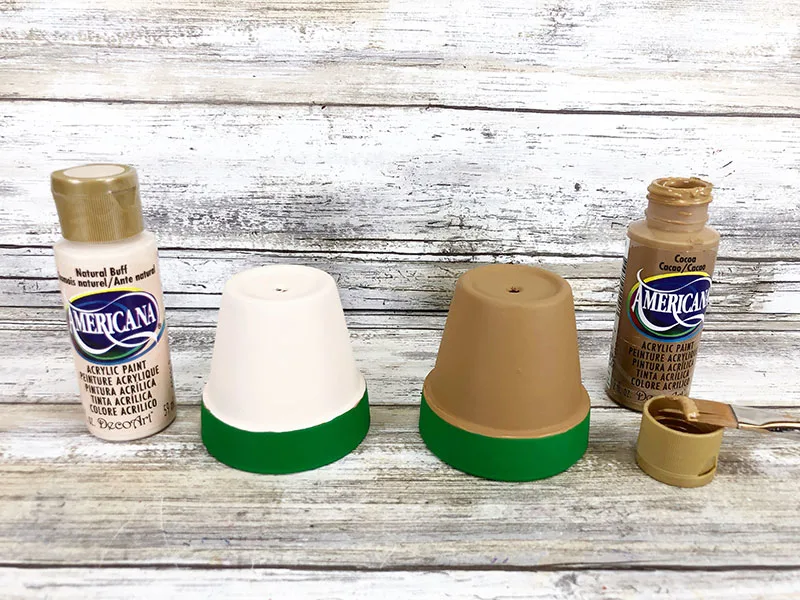
Then flip the mini pots upside down and paint the rest of the clay pot with your choice of flesh tone acrylic paint. Set aside to dry and apply a second coat if needed before moving on.

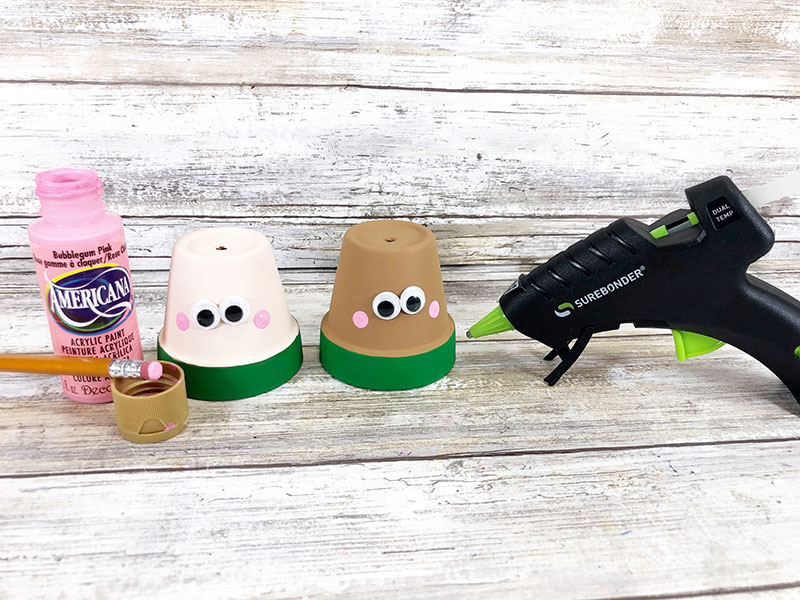
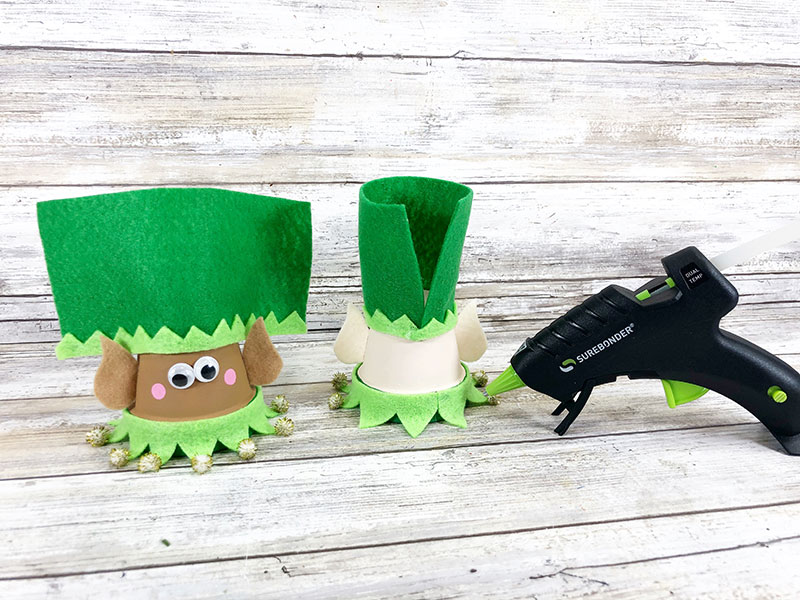
Glue two googly eyes to the side of each elf head with a glue gun and glue sticks.
Dip a new pencil eraser (or an item of similar size and shape) in pink acrylic craft paint and press it lightly against the side of the clay pot twice to make rosy cheeks.
Next, cut out the Clay Pot Elf Patterns and use them to trace and cut out pointy felt ears. (Use matching flesh tone colors of paint and felt.)

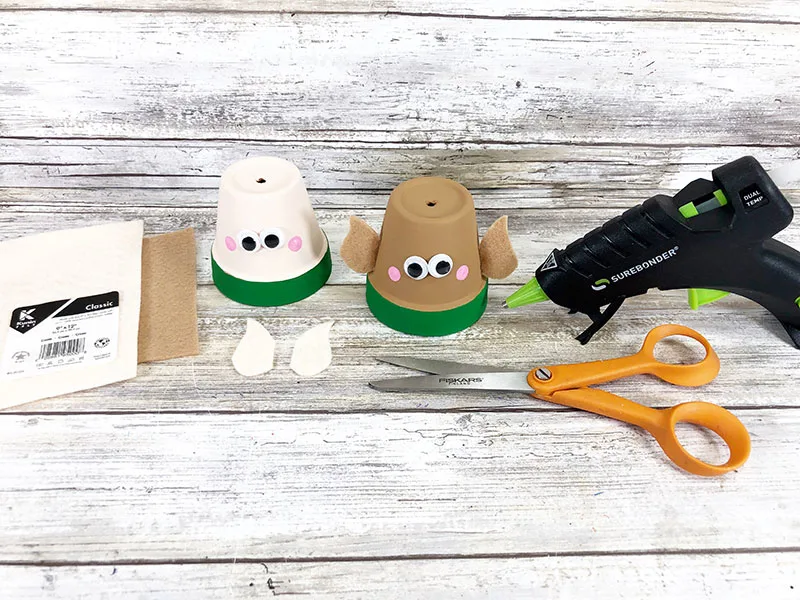
Attach the felt ears to the right and left of the elf clay pot with a glue gun and glue sticks. Use where you placed the eyes and cheeks to determine ear placement.
Trace and cut out a collar from bright green craft felt. Then create a zigzag pattern by cutting out triangles along the long edge of the rectangle.
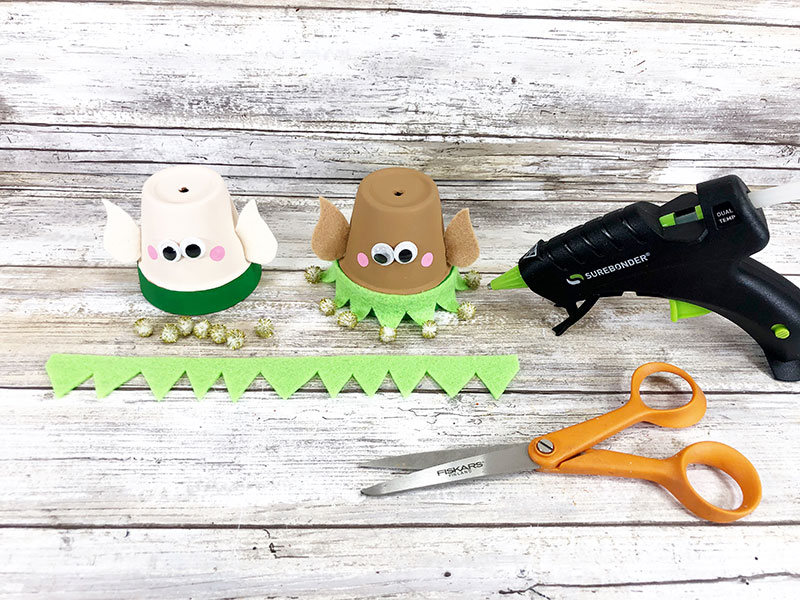

Glue gold tinsel pom poms to each point on the collar with a glue gun and glue sticks. Then glue the collar onto the rim of the clay pot.
Cut a 12” length of natural jute twine and tie it in a loop with a knot. Push the twine loop through the hole of the pot, leaving the knot inside. Use a glue gun to secure the knot and loop in place for hanging the ornament.
To make the elf’s hat, trace and cut out the large rectangle pattern using kelly green craft felt. Trace and cut the hat trim from bright green craft felt.
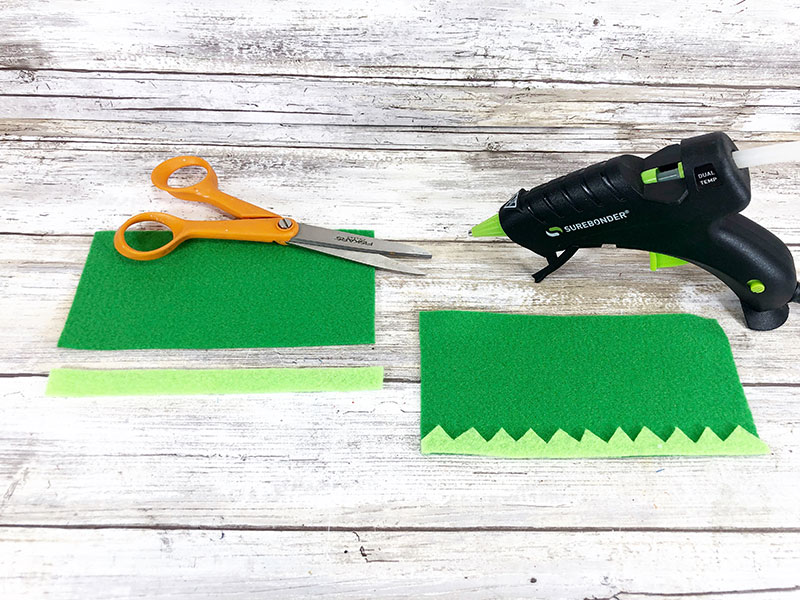
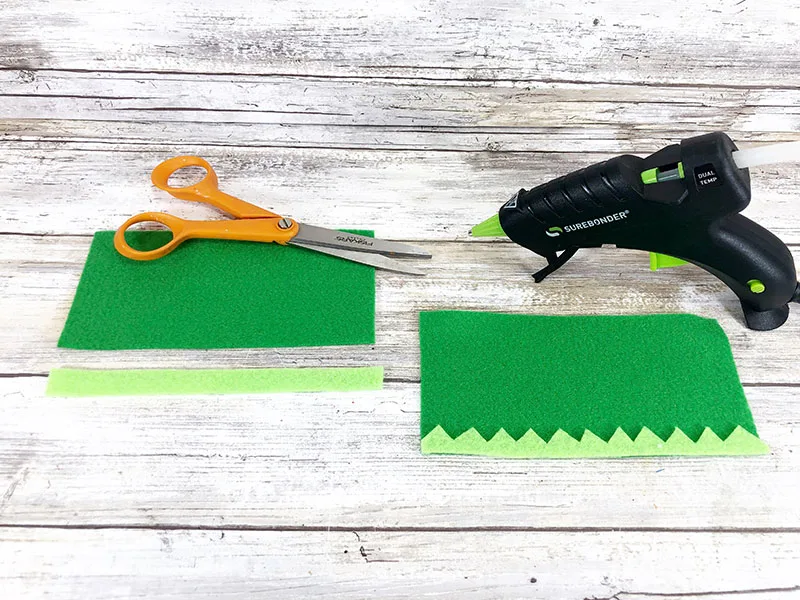
Make another zigzag pattern by cutting out triangles along the edge of the thin hat trim rectangle. Then glue the trim to the larger hat piece along one side.
Glue the hat around the clay pot just above the ears and glue the seam at the back of the hat to create a cylindrical shape.

Cut a 10” length of red and white baker’s twine and tie it in a bow securely around the felt to create the elf hat. Make sure the twine loop is sticking out through the top of the hat.
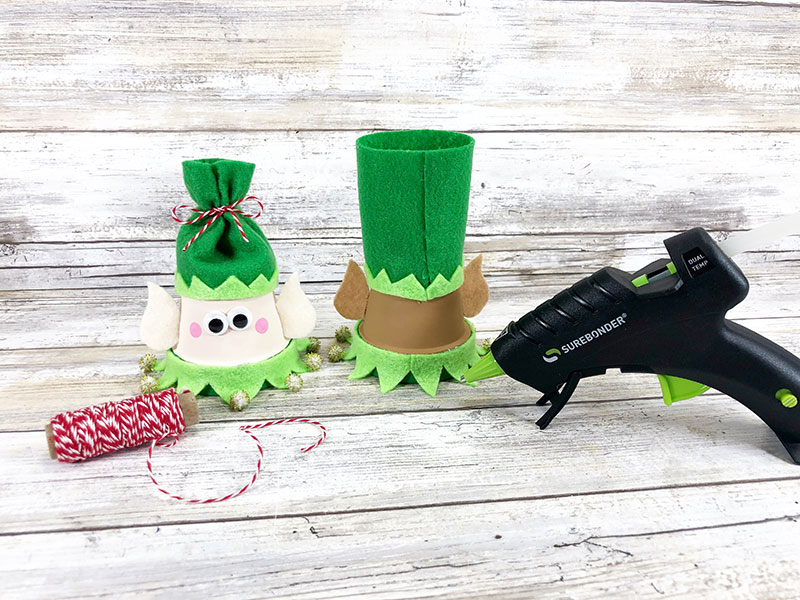
Finally, take a permanent black marker and draw a smile from cheek to cheek.
Now your mini clay pot elf is ready to be used as a cut place card for Christmas dinner, a fun gift tag on a holiday present, or as a Christmas ornament!
Christmas Coffee Filter Crafts for Kids:
Elf Clay Pot Christmas Ornament Craft
Make a cute elf ornament using a small clay flower pot with this easy Christmas craft for kids!
Materials
- Printable CLAY POT ELF PATTERNS
- Mini Clay Pots (2.5” in diameter)
- Acrylic Craft Paint in Flesh Tone Colors, Kelly Green, and Pink
- Craft Felt in Bright Green, Kelly Green, and Flesh Tone Colors to Match Paint
- Natural Jute Twine
- 2 Googly Eyes per clay pot
- Gold Tinsel Pom Poms
- Red and White Baker’s Twine
Tools
- Black Permanent Marker
- Low Temp Glue Gun or Tacky Craft Glue
- Scissors
- Paintbrush
- Pencil with New Eraser
Instructions
- First you will need to download and print out our Clay Pot Elf craft template or plan to draw and cut out your own pieces freehand.
- Paint the rim of the 2.5” clay pot with kelly green acrylic craft paint. Let the paint dry and apply a second coat, if necessary.
- Then flip the mini pots upside down and paint the rest of the clay pot with your choice of flesh tone acrylic paint. Set aside to dry and apply a second coat if needed before moving on.
- Glue two googly eyes to the side of each elf head with a glue gun and glue sticks. Dip a new pencil eraser (or an item of similar size and shape) in pink acrylic craft paint and press it lightly against the side of the clay pot twice to make rosy cheeks.
- Next, cut out the Clay Pot Elf Patterns and use them to trace and cut out pointy felt ears. (Use matching flesh tone colors of paint and felt.) Attach the felt ears to the right and left of the elf clay pot with a glue gun and glue sticks. Use where you placed the eyes and cheeks to determine ear placement.
- Trace and cut out a collar from bright green craft felt. Then create a zigzag pattern by cutting out triangles along the long edge of the rectangle.
- Glue gold tinsel pom poms to each point on the collar with a glue gun and glue sticks. Then glue the collar onto the rim of the clay pot.
- Cut a 12” length of natural jute twine and tie it in a loop with a knot. Push the twine loop through the hole of the pot, leaving the knot inside. Use a glue gun to secure the knot and loop in place for hanging the ornament.
- To make the elf’s hat, trace and cut out the large rectangle pattern using kelly green craft felt. Trace and cut the hat trim from bright green craft felt.
- Make another zigzag pattern by cutting out triangles along the edge of the thin hat trim rectangle. Then glue the trim to the larger hat piece along one side.
- Glue the hat around the clay pot just above the ears and glue the seam at the back of the hat to create a cylindrical shape.
- Cut a 10” length of red and white baker’s twine and tie it in a bow securely around the felt to create the elf hat. Make sure the twine loop is sticking out through the top of the hat.
- Finally, take a permanent black marker and draw a smile from cheek to cheek.
- Now your mini clay pot elf is ready to be used as a cut place card for Christmas dinner, a fun gift tag on a holiday present, or as a Christmas ornament!
Notes
You can use tacky craft glue for this project, but you will have to wait for it to dry. Using a hot glue gun will also make the finished ornament more durable.
Younger kids may need assistance with cutting out the felt pieces and assembling their elves. If doing this as a group activity, I recommend prepping the felt pieces ahead of time.


Darcy is the founder of “Life With Darcy and Brian,” where she combines her love for education, board games, and crafting to create engaging learning experiences for kids. Her creative projects and writing have been featured in outlets like The Toy Insider, CafeMom, Mom.com, Parents.com, Country Living, and The Pioneer Woman.
Esmé Slabbert
Saturday 25th of November 2023
Super super cute and perfect for our grandkids Thank you for sharing your links with us at #288 SSPS Linky. See you again next week.
Darcy Zalewski
Sunday 26th of November 2023
Thank you so much!