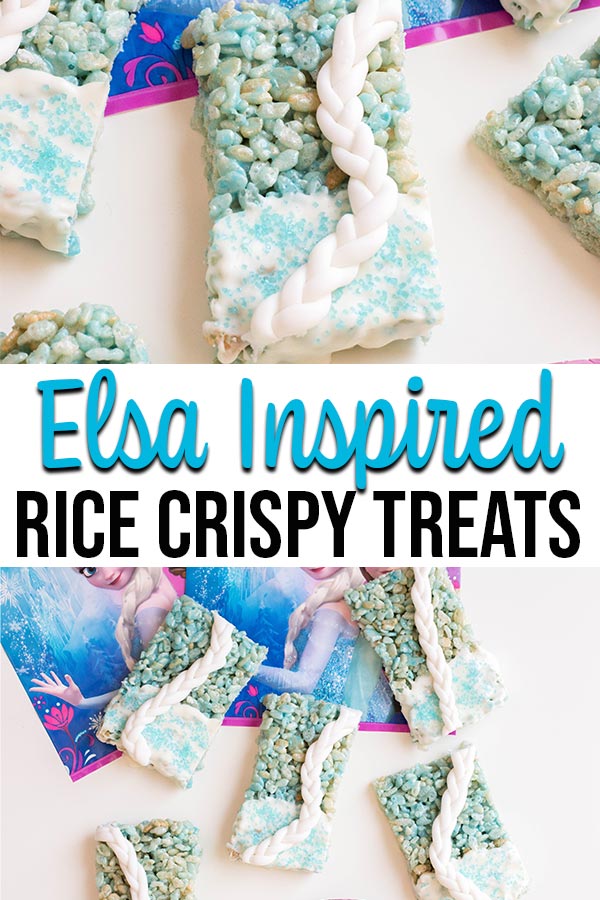
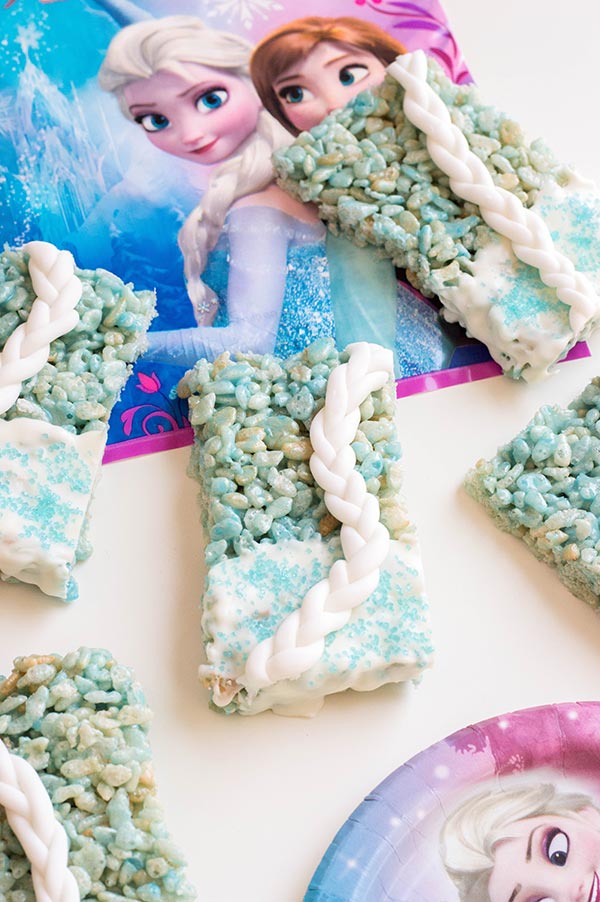
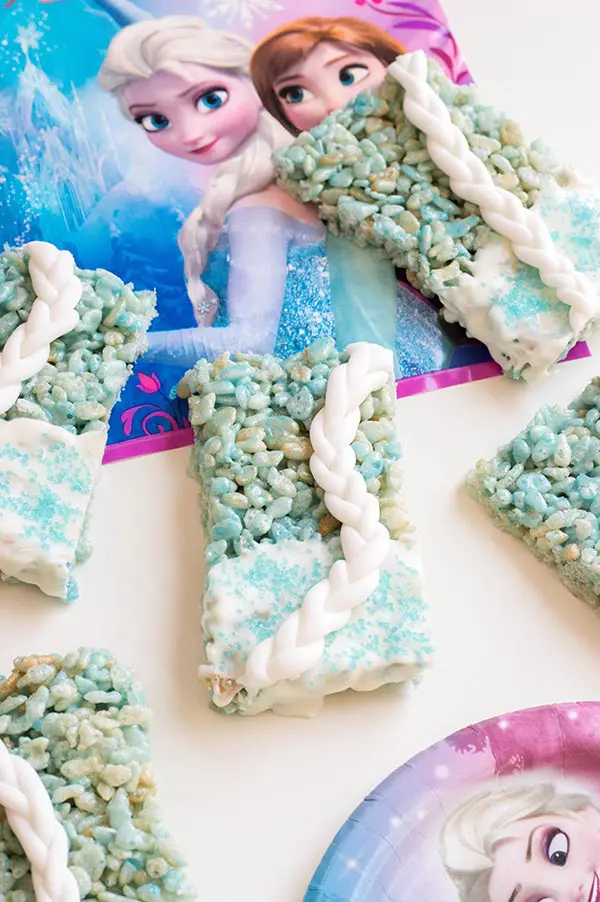
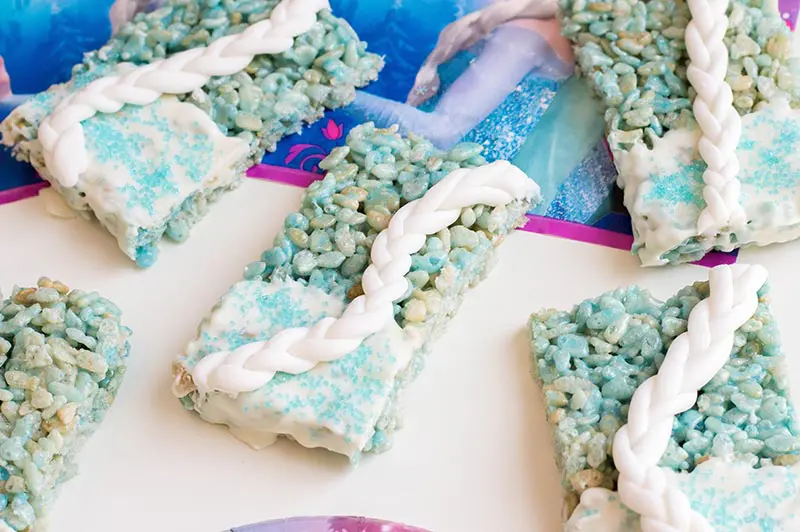
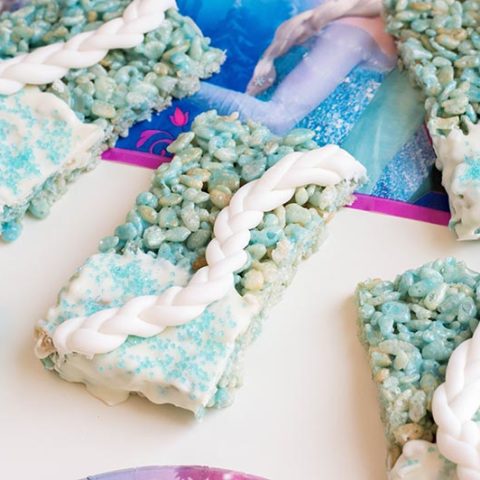
These pretty Elsa rice crispy treats are inspired by Elsa’s signature braid worn in Disney’s Frozen. They are perfect for a Frozen themed birthday party or a Frozen movie night!
Grab these printable Frozen 2 coloring pages, make Frozen Inspired Paper Roll Bracelets, relax with a Frozen inspired sensory bottle, and enjoy snacking on these treats for a fun afternoon with your kids.
This post contains affiliate links. As an Amazon Associate and a participant in other affiliate programs, we earn a commission on qualifying purchases.
How to Keep Rice Crispy Treats Soft
I’m sure you’ve experienced hard, crunchy rice krispies treats before. To keep your Elsa rice crispy treats from getting hard, use low heat to melt the butter and marshmallows.
I prefer to melt my butter and marshmallows on the stove so I can use low heat. Using the microwave or using high heat may seem quicker, but they may not turn out as soft after cooling.
Eating your rice crispy treats the day they are made is the best way to enjoy soft rice crispy treats.
However, if they have gotten hard, try placing a slice of bread with your rice crispy treats (in a zip top bag or airtight container) overnight. It sounds crazy, but it’s a great tip for keeping cookies soft too.
Can Elsa Rice Crispy Treats be Made Ahead?
Yes, you can make these ahead of time. While I love to eat rice krispie treats the day they are made, that doesn’t always work. If you are making these Elsa rice crispy treats for a birthday party, you have a couple options.
- You can make and store a few batches of plain rice krispie treats and then decorate them closer to the time of the party.
- You can make and fully decorate the Elsa inspired crispy treats a day or two ahead of time.

How to Store Rice Crispy Treats
Storing your homemade rice crispy treats properly is important if you are making them ahead of time or plan to give them out or sell at a bake sale. To store these Elsa cereal treats, place them in an airtight food storage container.
Depending on the number of treats you are packing and the size of your container, you make need to stack them on top of each other.
Place wax paper between the layers to reduce sticking together or wrap them individually in plastic wrap before putting them in the container.
Elsa Inspired Rice Crispy Cereal Treats Recipe
There is a printable version of this recipe available at the bottom of this post.
This recipe yields approximately 8 decorated rice crispy treats. The amount may vary depending on the size you cut the rice crispy bars.
Need more? Make more than one batch before you begin decorating them with Elsa’s braid.
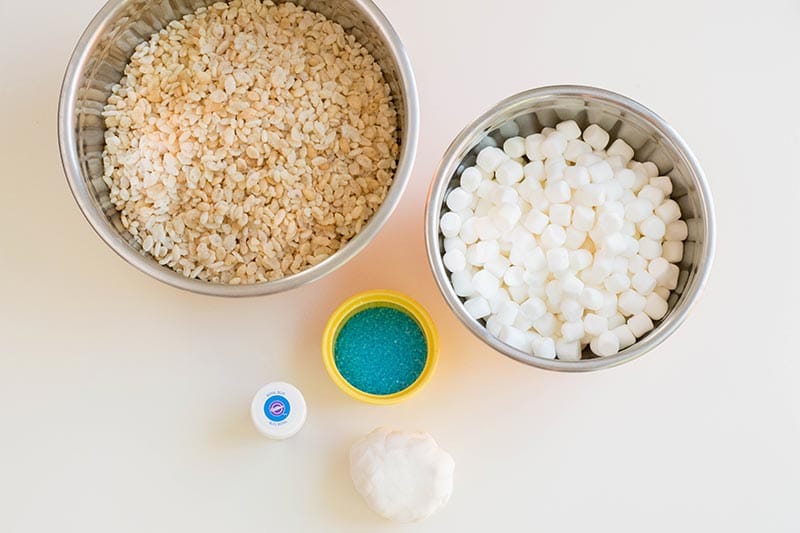
Elsa Rice Crispy Treat Ingredients
- Cooking spray
- 3 Tbsp butter
- 4 cups miniature marshmallows
- 2 small drops blue gel food coloring
- 6 cups rice cereal
- 1 cup white candy melts
- Blue crystal sprinkles
- 3-4 oz. white fondant
Helpful Tools:

How to Make Elsa Rice Crispy Treats
Start by coating a rectangular pan (13 x 9 inches in size) with cooking spray, then set aside.
Melt 3 Tablespoons of butter over low to medium heat in a large saucepan.
Once butter is completely melted, add miniature marshmallows and stir constantly until they are completely melted.
If you only have large marshmallows, you can use them instead of mini marshmallows. Just take care to measure out an equivalent amount (which is probably about 6 large).
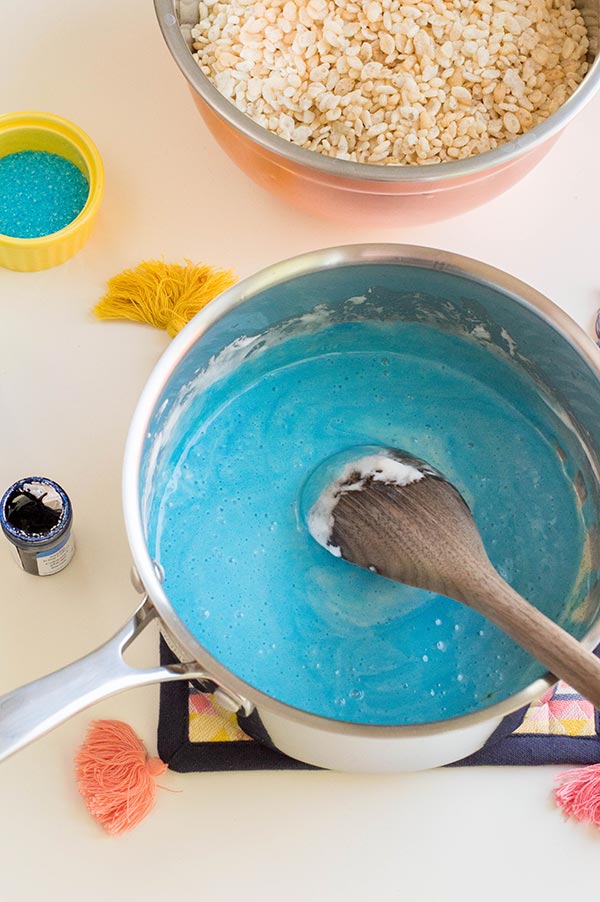

Next, remove the melted marshmallow mixture from heat and add about 2 drops of blue gel food coloring. Stir until the marshmallow mixture is completely tinted blue.
Add 6 cups of rice cereal into the melted marshmallows and fold until completely incorporated.

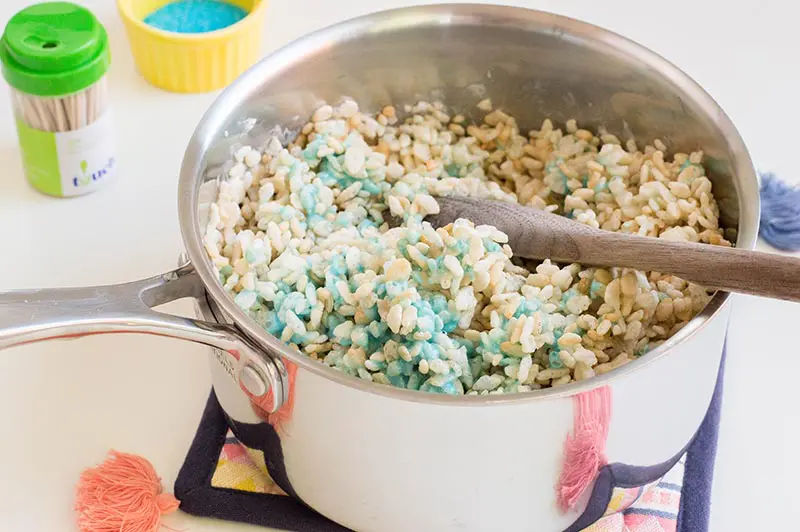
Pour rice cereal mixture into coated pan and press down. Keep the rice krispies from sticking to your hands by wetting your fingers with water first, then press them down into the pan.
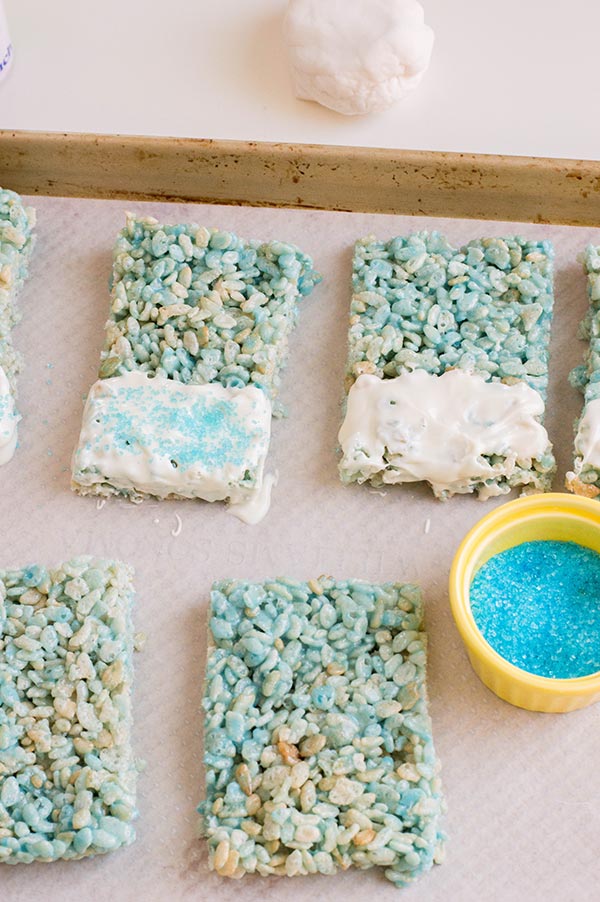
Allow to set for about 15-20 minutes before cutting into 8 rectangles. Set aside on a plate. Line a baking sheet with wax paper.
Place white candy melts in a Candy Melting Pot or in a microwave-safe bowl.
If using a candy melting pot, follow the directions for heating and melting the chocolate wafers.
If using the microwave, heat the candy melts for 20-30 seconds at a time, stirring in between, until completely melted.
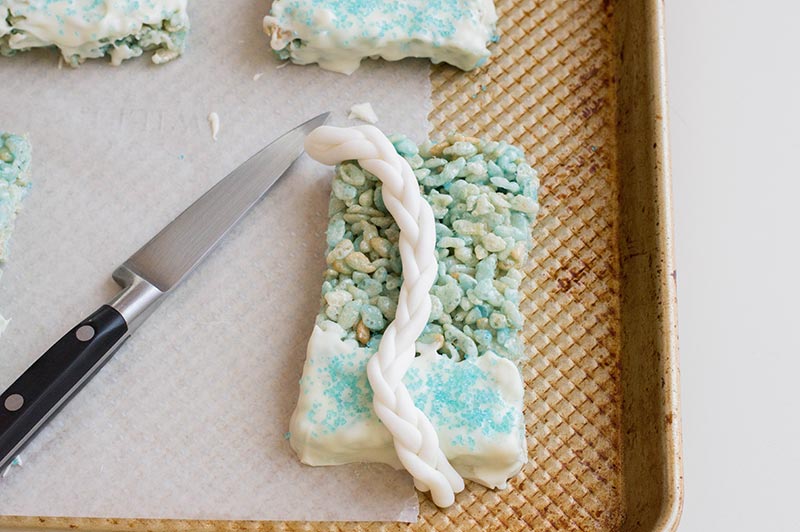
Dip the bottom half of each crispy cereal treat in the melted candy and gently set it on the lined baking sheet.
Quickly coat the white chocolate area with blue crystal sprinkles, and allow to set for at least 15 minutes.

Now it’s time to shape the fondant braids.
To make one fondant Elsa braid:
Roll out 3 spheres, about ¾ an inch in size each, of white fondant. Then roll the spheres into long strips, about 6 inches in length.
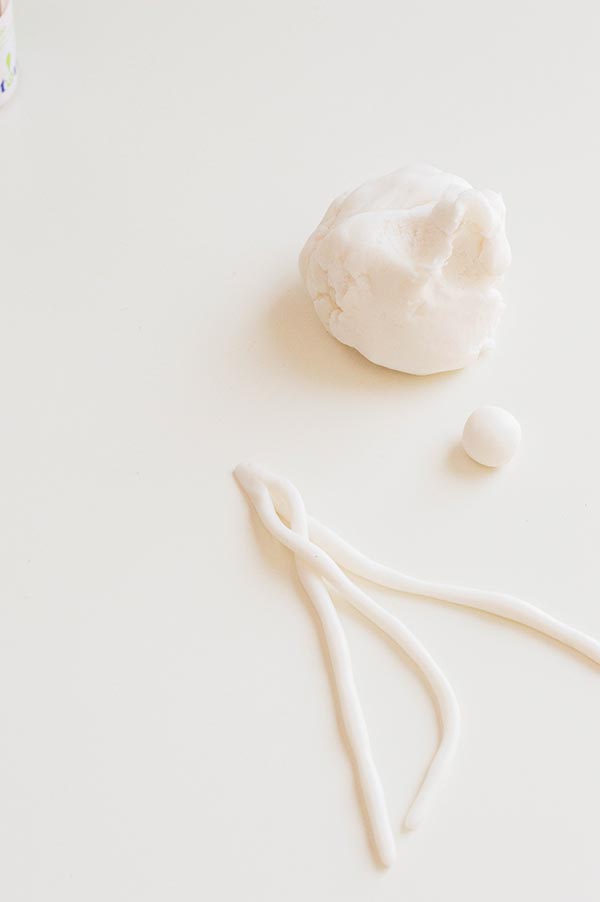
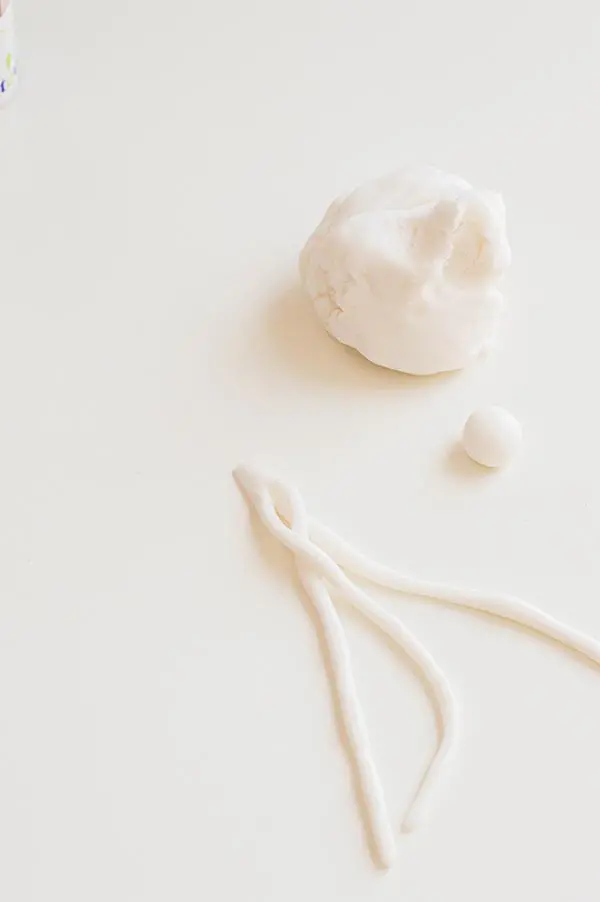
Place the long strips vertically, side by side and pinch the top. Braid the strips. Repeat until you have one braid for each treat.
Press the braided fondant onto a rice crispy treat (in no particular pattern). Trim excess fondant as necessary.

How Long Do Rice Crispy Treats Last?
If you are storing leftover Elsa rice crispy cereal treats or making them ahead for a Frozen themed party, they are good for about three days in an airtight container at room temperature or a bit longer if refrigerated.
Did you know you can freeze rice krispie treats? This would be an excellent time to make a joke about Frozen inspired rice crispy treats literally being frozen.
In all seriousness though, rice crispy treats can be frozen. This is helpful if you like to make several batches at once.
I’d suggest only freezing the basic rice crispy recipe, not the completely decorated Elsa treats. Freeze these treats for up to six weeks in an airtight container.
To defrost your crispy treats, let them sit on the counter at room temperature.
More Rice Crispy Treat Recipes:
- 3D Christmas Tree Crispy Treats
- Rainbow Unicorn Poop Crispy Treats
- Mummy Rice Crispy Treats
- Nightmare Before Christmas Sally Mickey Ears Crispy Treats
- Gingerbread Man Rice Crispy Treats
Printable Frozen Elsa Rice Crispy Treats Recipe Directions

Easy Elsa Inspired Rice Crispy Treat Recipe
Make these pretty Elsa Inspired Rice Crispy Treats for a Frozen themed birthday party or in celebration of the new Disney's Frozen 2 movie coming out!
Ingredients
- Cooking spray
- 3 Tbsp butter
- 4 cups miniature marshmallows
- 2 small drops blue gel food coloring
- 6 cups rice cereal
- 1 cup white candy melts
- Blue crystal sprinkles
- 4 oz. white fondant
Instructions
- Start by coating a rectangular pan (13 x 9 inches in size) with cooking spray, then set aside.
- Melt 3 Tablespoons of butter over low to medium heat in a large saucepan.
- Once butter is completely melted, add miniature marshmallows and stir constantly until they are completely melted.
- Next, remove the melted marshmallow mixture from heat and add about 2 drops of blue gel food coloring. Stir until the marshmallow mixture is completely tinted blue.
- Add 6 cups of rice cereal into the melted marshmallows and fold until completely incorporated.
- Pour rice cereal mixture into coated pan and press down. Keep the rice krispies from sticking to your hands by wetting your fingers with water first, then press them down into the pan.
- Allow to set for about 15-20 minutes before cutting into 8 rectangles. Set aside on a plate.
- Line a baking sheet with wax paper.
- Place white candy melts in a candy melting pot or in a microwave-safe bowl.
- If using a candy melting pot, follow the directions for heating and melting the chocolate wafers. If using the microwave, heat the candy melts for 20-30 seconds at a time, stirring in between, until completely melted.
- Dip the bottom half of each crispy cereal treat in the melted candy and gently set it on the lined baking sheet.
- Quickly coat the white chocolate area with blue crystal sprinkles, and allow to set for at least 15 minutes.
- To make one Elsa braid with fondant:
- Roll out 3 spheres, about ¾ an inch in size each, of white fondant.
- Roll the spheres into long strips, about 6 inches in length.
- Place the long strips vertically, side by side and pinch the top. Braid the strips. Repeat until you have one braid for each treat.
- Press the braided fondant onto a rice crispy treat (in no particular pattern). Trim excess fondant as necessary.
Serve and enjoy!
Notes
Times provided are an estimate.
Nutrition Information:
Yield: 8 Serving Size: 1Amount Per Serving: Calories: 364Total Fat: 5gSaturated Fat: 3gTrans Fat: 0gUnsaturated Fat: 2gCholesterol: 11mgSodium: 176mgCarbohydrates: 79gFiber: 0gSugar: 47gProtein: 2g
Nutrition information isn't always accurate and may vary based on ingredients and measurements used.